Posted on

Axolotl skin growths

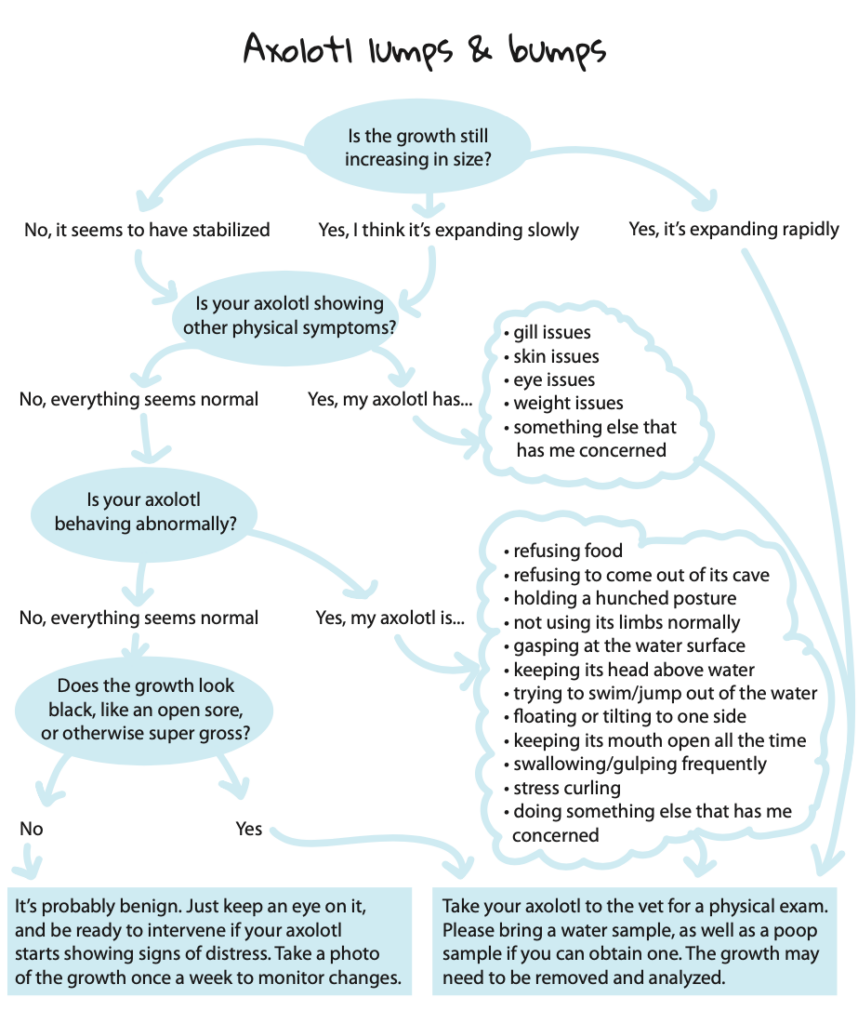
What should you do if your axolotl suddenly sprouts some kind of mass? Here’s a flowchart to help you navigate through the lumps and bumps.

Axolotl skin growth flowchart

Are you having difficulty finding a vet for your axolotl? Your local cat and dog vet should be able to refer you. If you’re in my area (Montréal, QC), email me for a recommendation. In Canada and the US, you can also try online services such as fishvet or vetster.

Are you a vet willing to treat axolotls? Email me so I can help you get the word out, and connect you to other vets with axolotl experience.

Posted on

How to Tub Your Axolotl

The proper way to tub your axolotl depends on what you are trying to accomplish. There are several reasons why you might want to tub your axolotl:

  • To house your axolotl while your tank is cycling
  • To hold your axolotl during water changes, feeding and/or emergencies
  • To treat a sick/injured axolotl
  • To transport an axolotl during a move or a trip to the vet
  • To house growing larvae or juveniles
  • To house a special-needs axolotl permanently

I’m going to cover the first point right now, since that’s the information most people need in a hurry, and I’ll come back and edit the rest in later when I’m in less of a hurry. (Oh, the joys of running your own business!) But first, here’s a quick list of food-grade plastics — you’ll need to refer to it when choosing a housing container for your axolotl.

Plastics considered food-safe in Canada

  • Plastic #1 (PETE)
  • Plastic #2 (HDPE)
  • Plastic #4 (LDPE)
  • Plastic #5 (PP)

How to tub your axolotl while your tank is cycling

You will need:

  • two food-safe plastic totes, large enough for your axolotl to move around comfortably
  • at least one piece of floating decor, to provide shade and prevent jumping (anything reminiscent of a lily pad is appreciated!)
  • water conditioner, if your tap water is treated with chlorine/chloramine
  • a turkey baster (choose one with a wide opening if possible)
  • a thermometer
  • a soft sponge (nothing that could scratch plastic)

Follow these steps once a day:

  1. Fill up a clean, dry plastic container with cold tap water (enough to cover your axolotl by at least 2 inches). Add water conditioner if needed.
  2. Remove any decor and set aside.
  3. Use the turkey baster to remove any axolotl poop. Dump it right into your aquarium! It will keep your bacteria fed and help the cycling process.
  4. Feed your axolotl before transferring it to the new clean tub.
  5. Once your axolotl is done eating and both tubs are roughly the same temperature (±2°C), transfer your axolotl.
  6. Use the soft sponge and hot water to clean the decor. Rinse with cold water, then add to the clean tub.
  7. Dump out the dirty water. Use the soft sponge and hot water to clean the tub. Let it air dry.

Other tubbing scenarios coming soon! If you need help with tubbing in the meantime, feel free to email me. For cycling help, check out these articles: Introduction to the Nitrogen Cycle and How to Cycle Your Aquarium.

Posted on

Bigger is better! (Why you should get the largest tank possible)

Whether you’re a beginner or an experienced aquarist, here’s why you should buy the BIGGEST tank you can afford.

1. It’s less work!

Larger tanks require fewer water changes. Having a larger tank allows you to use more filtration, which keeps your water cleaner longer.

2. It’s more forgiving of your mistakes

Everything is more stable when you’re dealing with a larger body of water: the temperature doesn’t fluctuate as much, pH is more likely to stay constant, and nitrogenous waste has less of an impact when there’s a lot of water to begin with. These three factors (temperature, pH and nitrogenous waste concentration) also affect the overall toxicity of ammonia (article coming soon!). This means that smaller setups are more likely to swing rapidly between non-toxic and toxic conditions. Some species such as freshwater shrimp are especially sensitive to sudden environmental changes, which makes them challenging to keep in a small environment.

3. Your animals will appreciate it.

A larger enclosure gives you the opportunity to provide a more natural environment for your animal. They will certainly appreciate the freedom of movement and the mental stimulation that a more complex environment can afford. An animal who is comfortable in their enclosure will reward you by displaying more natural behavior.

4. It helps them fight off viruses!

Larger tanks provide a temperature gradient — the surface is warmer than the bottom of the tank. One side may also be warmer than the other, depending on light positioning (and heater positioning, if you’re keeping tropical species). Having a temperature gradient in your tank allows your animals to adjust their body temperature, and even to self-medicate! Fish and amphibians are poikilotherms, which means their body temperature is meant to vary along with their environment. It also means that their bodies are not able to trigger a fever when they are sick. Instead, they rely on what we call behavioral fever: a sick animal will gravitate to the hottest area of the tank, act sluggish for a while, and wait for the virus or bacterial infection to pass. Amphibians are also particular in the way that they gravitate to colder temperatures when recovering from illnesses and injuries. Some scientific studies suggest that axolotls’ impressive recovery abilities function best at near-hibernation temperatures.

Posted on

Axolotl breeding, part 1: genetic and health considerations

Selecting a female

Female axolotls can lay up to 1000 eggs at once, which is exhausting for the female. She does not get a break to recover afterwards — her body immediately resumes gamete production, which comes with a high energy cost. For this reason, repeatedly beeding a female can be detrimental to her health. Breeding her too early can also interfere with her growth. Please be mindful of these considerations when choosing a female to breed — choose a female who’s fully grown (at least a year old) and has a healthy appetite and appearance, with a big round belly. Keep in mind that the same female should only be bred a maximum of three times in her lifetime, with a long break in between breedings. Personally, I try to breed females only once, unless they have exceptional characteristics. I also never breed females more than once a year.

Selecting a male

When it comes to choosing a male, the most important thing to consider is genetics. You’ll want to make absolutely sure that your male has no family relation with your female — this would lead to genetic defects in the offspring that can be quite dramatic. Beyond that, it helps to be familiar with how genes combine to create different morphs (phenotypes). Personally, I like to select males with traits that match the female’s best characteristic: for example, my “K” line is all about cute round faces, whereas my “B” line is all about blue gills.

Traits to avoid

You should never, ever breed axolotls with obvious genetic defects, such as:

  • dwarfism [article coming soon!]
  • short toes syndrome
  • “mini” features
  • any physical deformation that isn’t due to regrowth after nipping
  • a tendency to float frequently (especially upside down)
  • other recurrent health issues (e.g. very prone to fungus)

In case of accidental breeding

If you’ve accidentally kept a male and a female together and ended up with eggs, it may seem like the kind choice to keep them and raise them… But in reality, it’s the self-indulgent route that should be avoided in most cases. If the two parents are genetically related (e.g. brother and sister), or if one or both parents have genetic defects, you really wouldn’t be doing the larvae a favor by attempting to raise them. Not only would it compromise their quality of life, but it also poses a risk that the genetic issue will be passed on to future generations if those axolotls also end up getting bred (accidentally or otherwise).

Avoid this rookie mistake!

Another important point to consider is: how many of the eggs can you afford to keep? Raising larvae requires time, effort and space. They are also complicated and expensive to feed, compared to adults. If you are breeding axolotls for the first time, I wouldn’t recommend keeping more than 10. If you keep more than you are able to care for, you will be stretching your resources thin, and the quality of your care will suffer. Trust me — don’t try raising hundreds of axolotls on your first try. You have plenty of time to try your hand at raising more after you’ve brought these first 10 to maturity. You’ll be better prepared to tackle higher numbers once you have a clear idea of the challenges involved.

How to get rid of unwanted axolotl eggs

Freeze them. This will cause the larvae to go into hibernation mode, dulling their sense of pain before vital functions shut down. They will be unconscious before ice crystals begin to form. Once they are frozen solid, you can dispose of the eggs in the compost or trash.

Happy responsible breeding! : )